


Overview
The StrategyX MCP server connects your StrategyX workspace to AI assistants that support the Model Context Protocol (MCP), such as Claude, ChatGPT, Gemini and Grok. Once connected, you can ask the assistant about the work in your company in plain language. It looks up the answer in StrategyX for you, so you don't have to open the app and search.
For example, you can ask which of your actions are overdue, which tactical projects are due this month or what was said in the latest notes on a project. You can also make updates in StrategyX without leaving the chat.
The connector works as you. It can only see what your StrategyX user can already see, in the companies you choose when you connect.
Server URL:
Before you start
You need:
- AI connectors switched on for your company. AI connectors are off by default. If you aren't sure whether they are on, ask your StrategyX administrator. See For administrators.
- An MCP-capable AI assistant. For example, Claude, ChatGPT, Gemini or Grok on the web. Other MCP clients that support OAuth sign-in can connect using the server URL above.
Connect StrategyX
- Go to claude.ai or open the Claude desktop app.
- Make sure you are signed in to your Claude account.
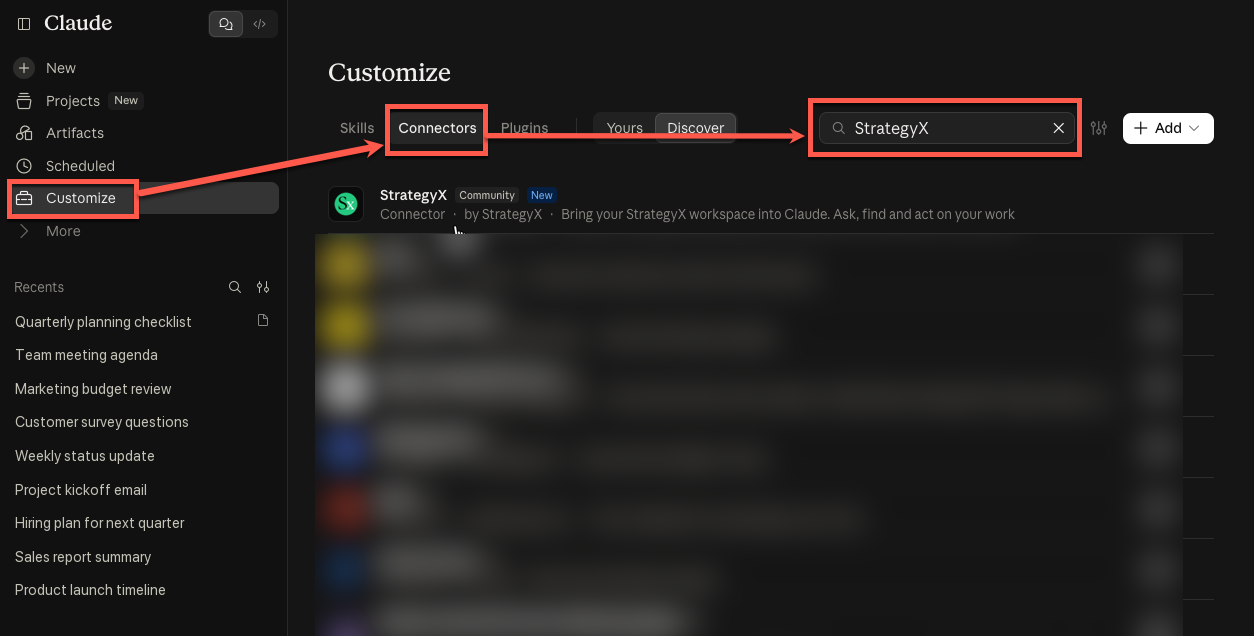
- Select Customize in the left sidebar.
- Select the Connectors tab, then select Discover.
- Type StrategyX in the search box, then select StrategyX (Connector by StrategyX) from the results.
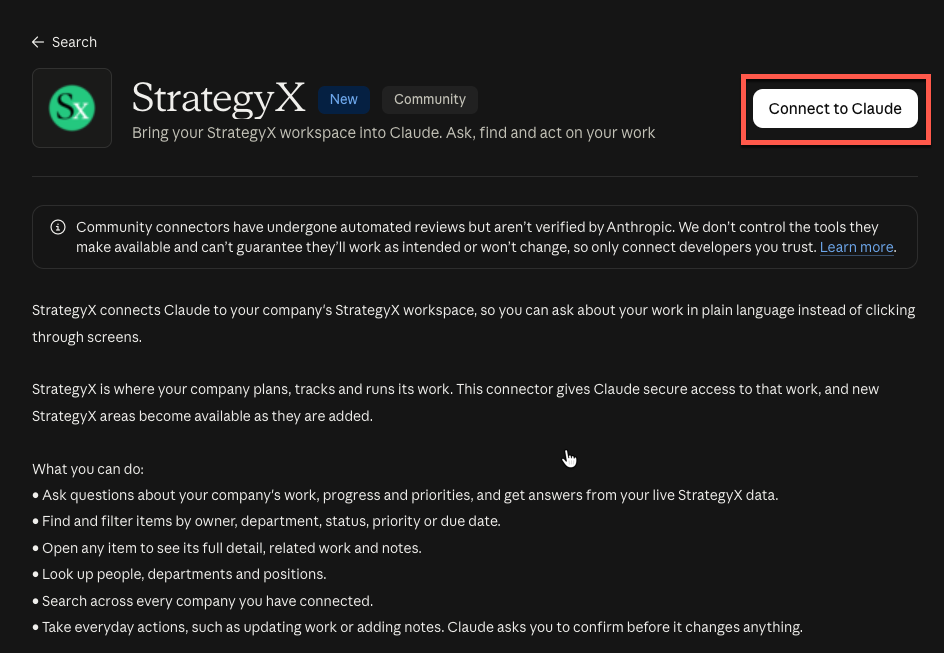
- On the StrategyX connector page, select Connect to Claude.
- You are taken to the StrategyX sign-in page. Enter your StrategyX email address and password, then follow the steps on screen (see Sign in and choose companies).
- That's it. StrategyX is now connected to Claude.
Can't find StrategyX in the list? You can add it as a custom connector instead. In Customize > Connectors, select + Add > Add custom connector, enter StrategyX as the name and https://mcp.strategyx.app/mcp as the URL, then select Add and Connect.
- Go to chatgpt.com.
- Make sure you are signed in to your ChatGPT account.
- Select your name in the bottom-left corner, then select Settings.
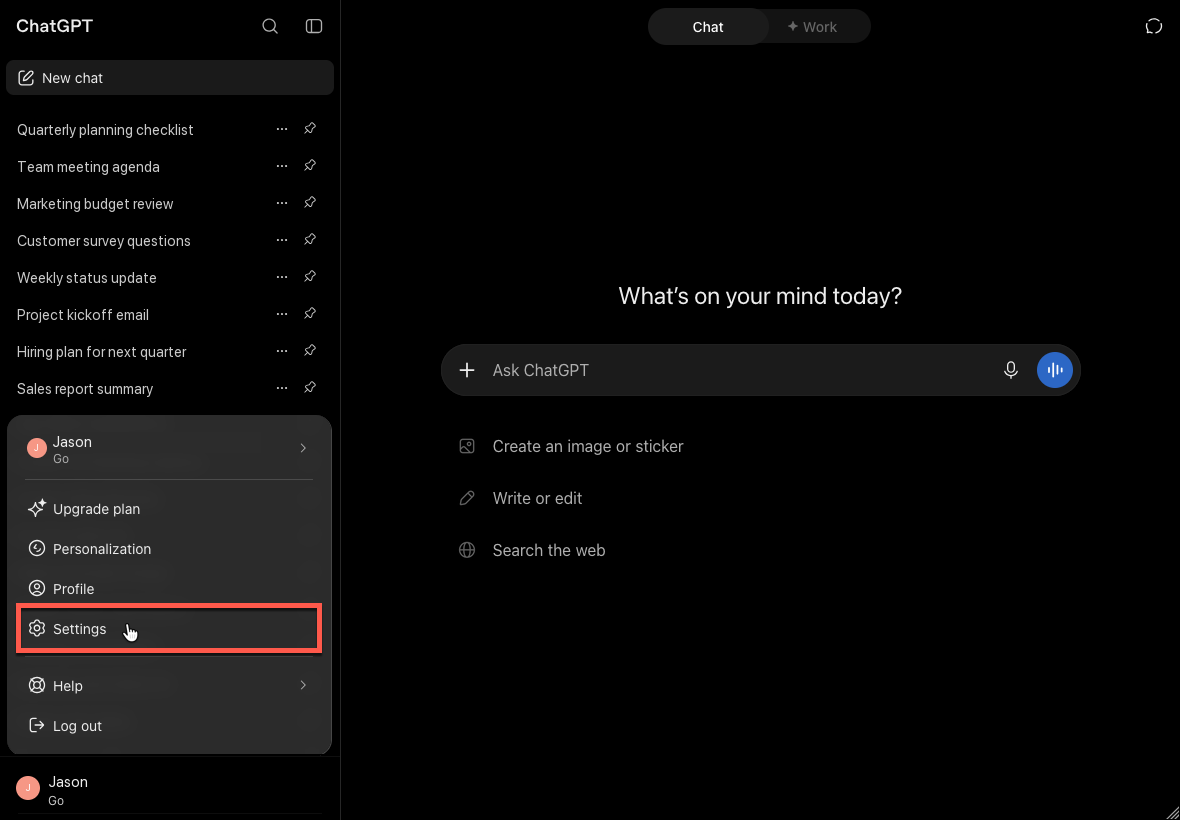
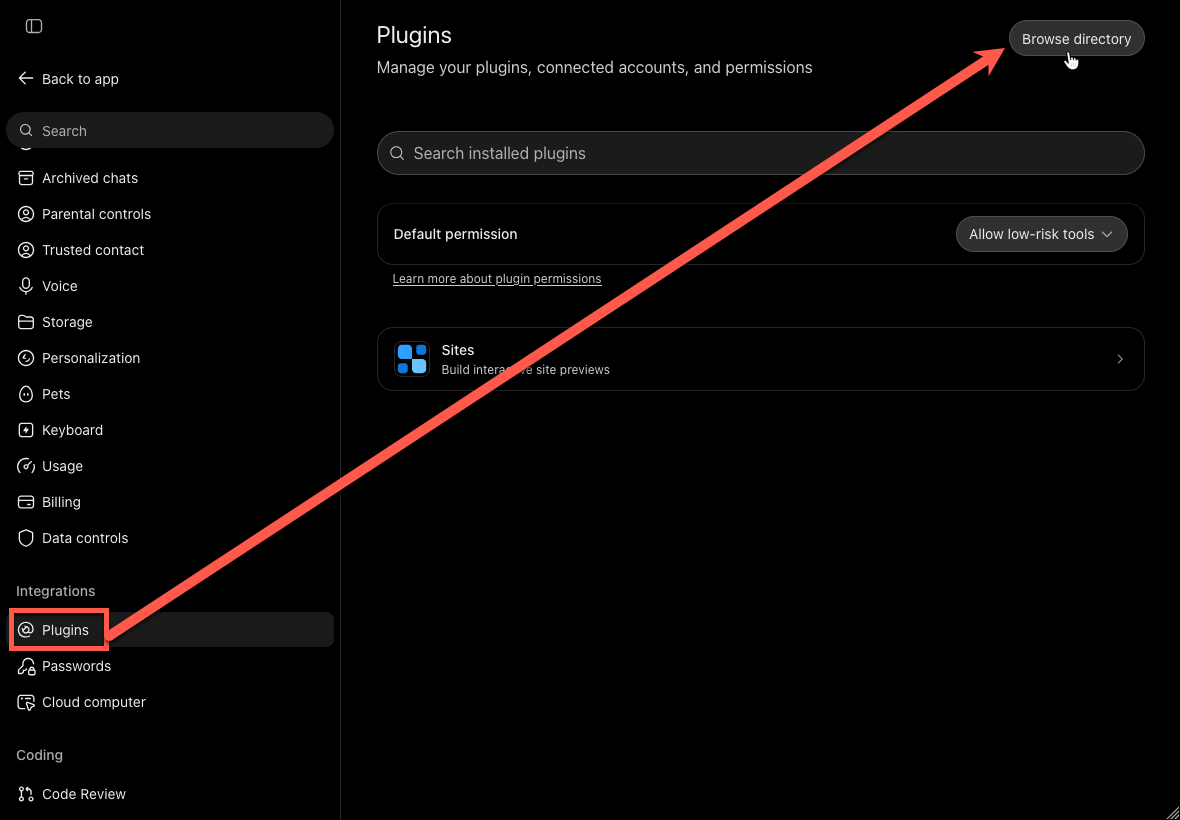
- In Settings, select Plugins under the Integrations section. You can also type Plugins in the search box at the top of the side menu.
- On the Plugins page, select Browse directory in the top-right corner.
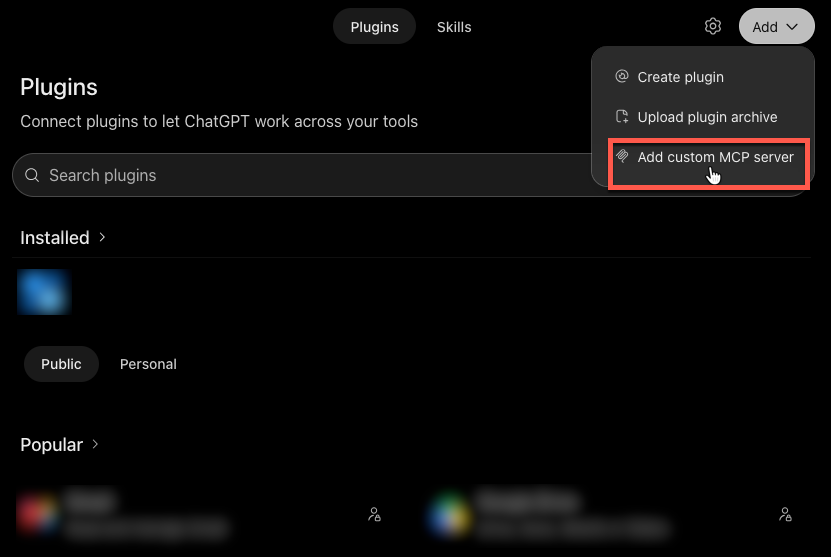
- The Plugins directory opens. Select Add in the top-right corner, then select Add custom MCP server.
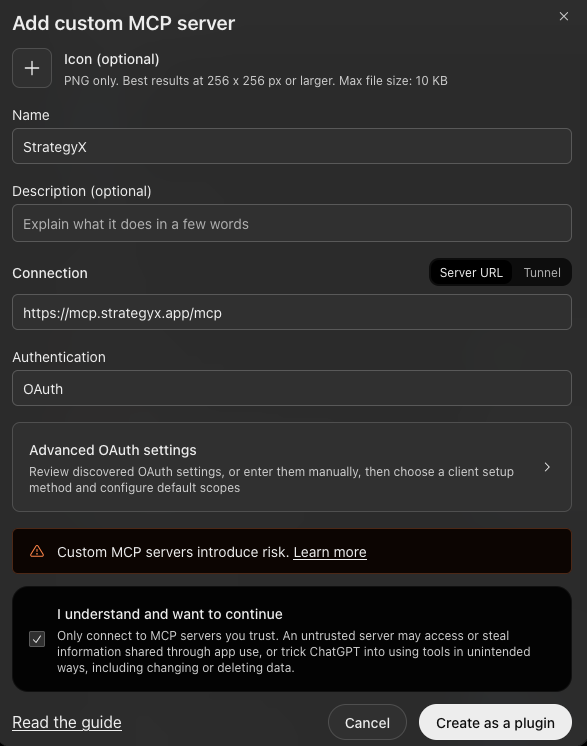
- Fill in the form with the following details:
- Name: StrategyX
- Connection: keep Server URL selected and enter
https://mcp.strategyx.app/mcp - Authentication: OAuth
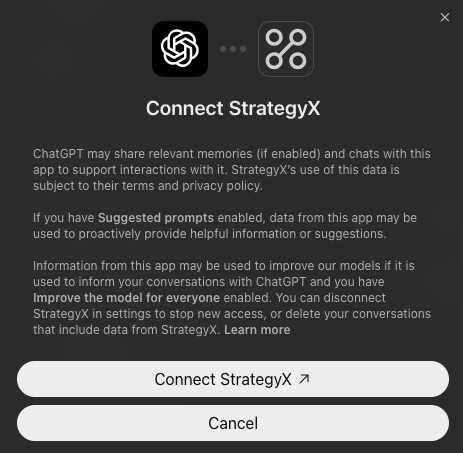
- A Connect StrategyX window opens. Select Connect StrategyX.
- You are taken to the StrategyX sign-in page. Enter your StrategyX email address and password, then follow the steps on screen (see Sign in and choose companies).
- That's it. StrategyX is now connected to ChatGPT.
Custom MCP servers are available on all ChatGPT plans, including Free. On Business, Enterprise and Edu plans, a workspace admin may need to allow them first.
- On a computer, go to gemini.google.com.
- Make sure you are signed in to your Google account.
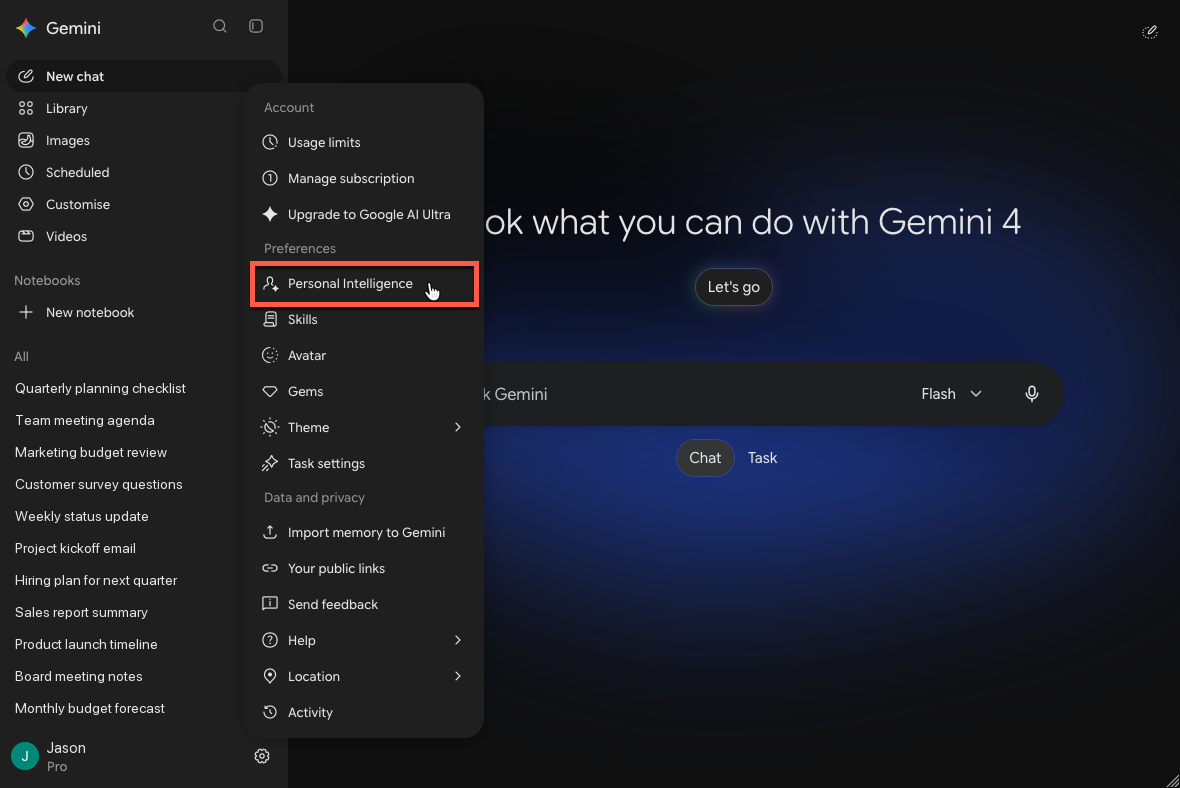
- Select the Settings (gear) icon next to your name in the bottom-left corner, then select Personal Intelligence.
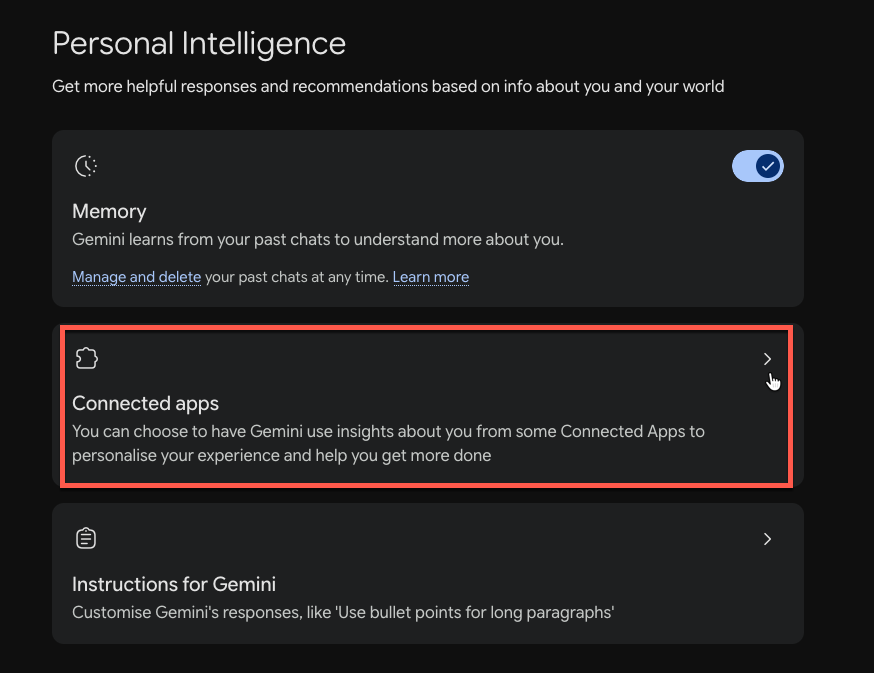
- On the Personal Intelligence page, select Connected apps.
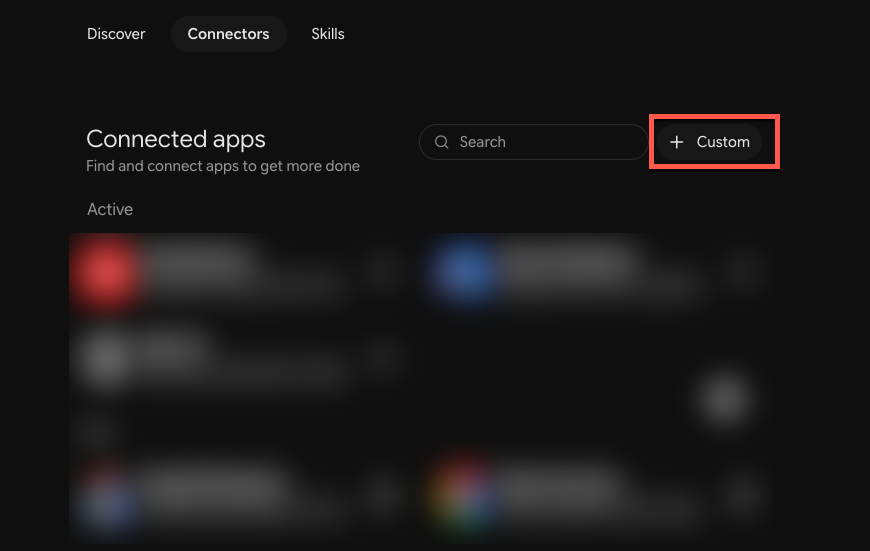
- On the Connectors tab, select + Custom next to the search box.
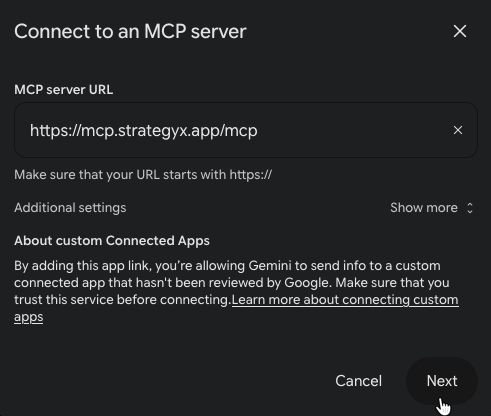
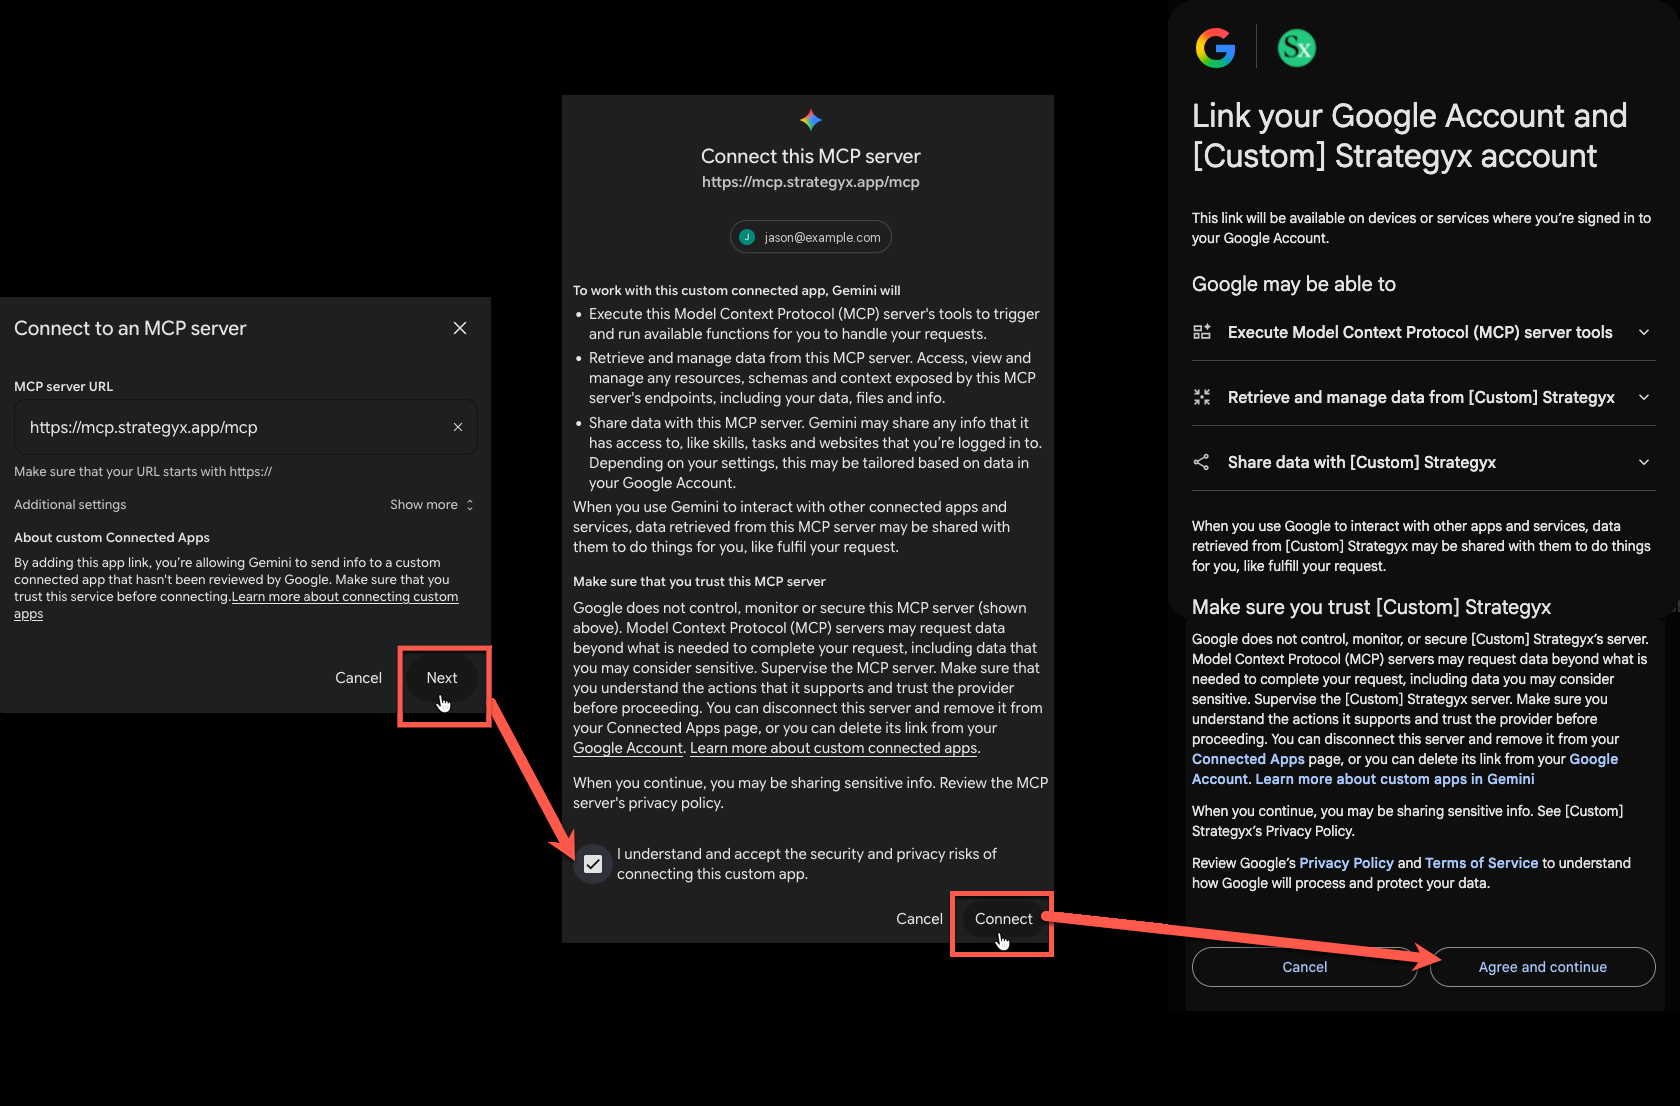
- In the Connect to an MCP server window, enter the following as the MCP server URL, then select Next. You don't need to change Additional settings.
- MCP server URL:
https://mcp.strategyx.app/mcp
- MCP server URL:
- The Connect this MCP server window opens. Read the information, tick I understand and accept the security and privacy risks of connecting this custom app, then select Connect.
- Google asks you to link your Google Account and your StrategyX account. Review the permissions, then select Agree and continue.
- You are taken to the StrategyX sign-in page. Enter your StrategyX email address and password, then follow the steps on screen (see Sign in and choose companies).
- That's it. StrategyX is now connected to Gemini.
Custom apps currently need a personal Google account (not a work or school account), and you must be 18 or over, in the US, using Gemini in English, with Keep Activity switched on. On Gemini Enterprise, a team admin adds the server at business.gemini.google under Manage team > Connected apps > Add MCP Server.
- Go to grok.com.
- Make sure you are signed in to your Grok account.
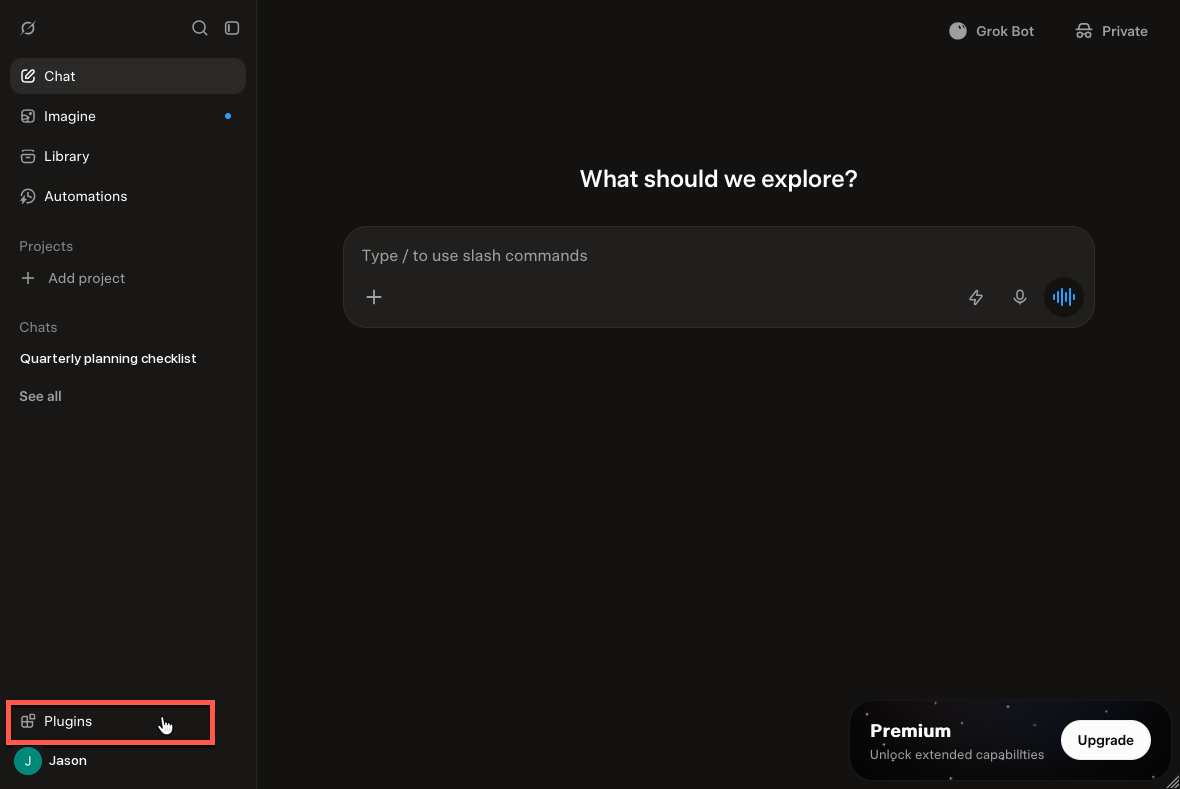
- Select Plugins in the bottom-left corner, just above your name.
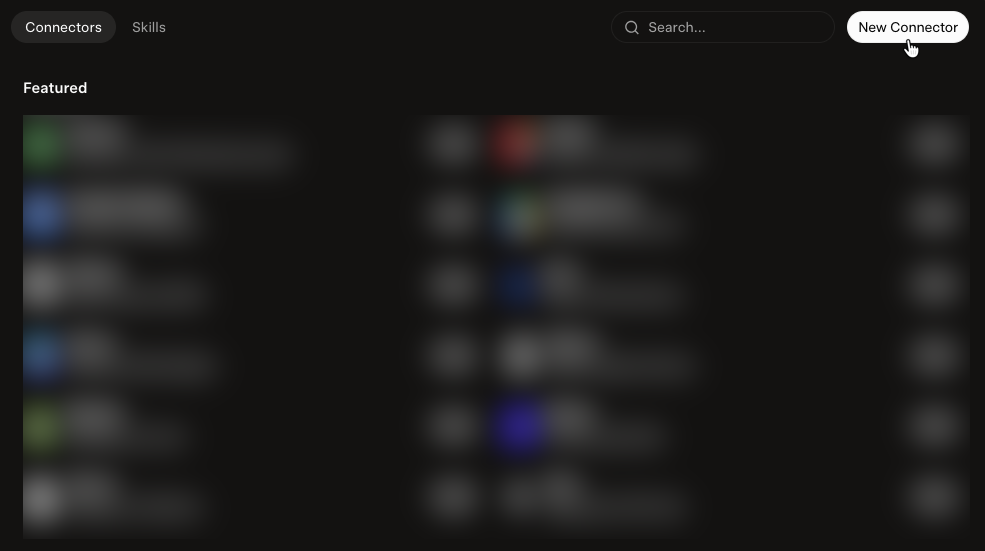
- On the Connectors tab, select New Connector in the top-right corner.
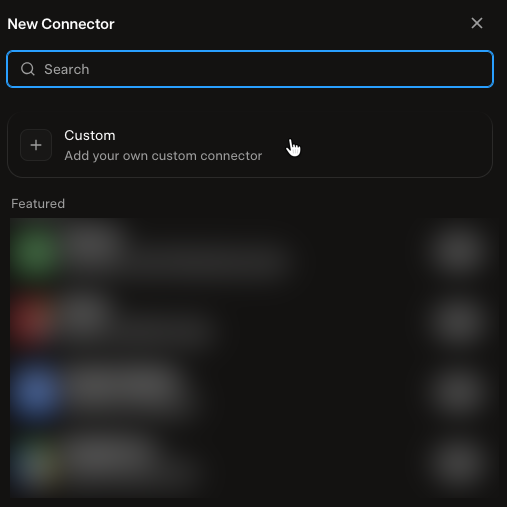
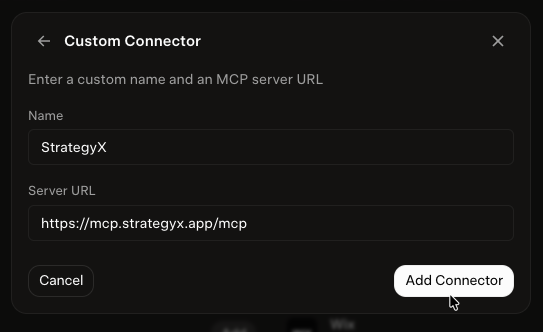
- In the New Connector window, select Custom.
- Fill in the form with the following details, then select Add Connector:
- Name: StrategyX
- Server URL:
https://mcp.strategyx.app/mcp
- You are taken to the StrategyX sign-in page. Enter your StrategyX email address and password, then follow the steps on screen (see Sign in and choose companies).
- That's it. StrategyX is now connected to Grok.
Custom connectors are available on the free Grok plan too. On Grok Business and Enterprise, a team admin first adds the connector in the xAI console (console.x.ai) under Grok Business > Connectors > + Add Connector > Other. Members then connect their own account at grok.com/connectors.
You can connect StrategyX to any other AI assistant or app that supports remote MCP servers. The exact menu names vary between apps, but the steps are the same.
- Open your AI assistant and make sure you are signed in to your account.
- Go to its settings and find the section for Connectors, Integrations, Plugins or MCP servers.
- Choose the option to add a custom or remote MCP server.
- Fill in the form with the following details:
- Name: StrategyX
- Server URL:
https://mcp.strategyx.app/mcp - Transport (if asked): Streamable HTTP
- Authentication (if asked): OAuth
- Save the server, then select Connect (or the equivalent option) if your app doesn't start the connection automatically.
- You are taken to the StrategyX sign-in page. Enter your StrategyX email address and password, then follow the steps on screen (see Sign in and choose companies).
- That's it. StrategyX is now connected to your AI assistant.
Your app must support remote MCP servers over Streamable HTTP with OAuth 2.1 sign-in. If it only supports local MCP servers or asks for an API key, it can't connect to StrategyX yet.
Sign in and choose companies
When you connect, StrategyX opens its own sign-in page. Your password goes only to StrategyX and is never shared with the AI assistant.
- Sign in with your StrategyX email and password.
- If you use two-factor authentication, enter your code.
- Choose the companies the AI assistant may access. You can choose up to five. Companies where AI connectors are switched off are shown as Not enabled and can't be selected.
- Confirm. You are sent back to your AI assistant, and the connection is ready.
To add or remove a company later, disconnect StrategyX in your AI assistant and connect again.
What the AI assistant can do
The StrategyX MCP server gives your AI assistant a set of tools for working with your StrategyX data. You don't call these tools yourself. The assistant picks the right one based on your question. Your AI assistant's connector settings always show the current list of tools, since we add more over time.
Find and read information
The assistant can look up and summarise the work in your company. This includes actions, tactical projects, ideas, problems, records of discussion, notes, and the people, departments and positions in your company. It can filter results (for example, by owner, department, status, priority or due date), open an item's full details and search across the companies you connected.
Make updates
The assistant can also make some changes for you, such as completing an action or adding a note. Updates follow the same rules as the StrategyX app. If the app wouldn't let you make a change, the assistant can't make it either and will tell you why. Your AI assistant may also ask you to confirm before it makes a change. Administrators can limit the connector to read-only use (see For administrators).
Example prompts
- "What are my overdue actions in StrategyX?"
- "Which tactical projects are due this month, and who owns them?"
- "List the high-priority actions assigned to the Operations department."
- "Summarise the latest notes on the Website Redesign project."
- "Show me the open problems raised in the last two weeks."
- "Mark the action 'Send Q3 board pack' as complete and add a note saying it was emailed on Friday."
If you connected more than one company, include the company name in your question, or the assistant will ask which one you mean.
Permissions and data
- Your access, nothing more. Every request runs as your StrategyX user. The assistant sees only the items your user can see in the app, and only in the companies you chose at sign-in.
- Changes are made as you. A note added or an action completed through the assistant appears in StrategyX under your name, just as if you had done it in the app.
- Secure sign-in. The connector uses OAuth. StrategyX gives the AI assistant short-lived access tokens, never your password. Changing your password or two-factor settings, or having your user deactivated, ends existing connections.
- Request logs. StrategyX keeps a record of each request made through the connector for security and troubleshooting.
- Third-party processing. Data returned to the assistant is processed by the AI provider (for example, Anthropic for Claude) under that provider's terms and privacy policy.
For full details of what is shared and how long it is kept, see the AI assistants section of our Privacy Policy and our Terms of Use.
For administrators
AI connectors are controlled per company, so you decide whether your team can use them.
- Switch AI connectors on. To turn on AI connectors for your company, contact [email protected] from an administrator account. Until they are on, nobody in the company can connect an AI assistant to it.
- Read-only use. If you want AI assistants to read data but not make changes, ask support to turn off updates for your company.
- Switch AI connectors off. Turning AI connectors off stops all AI assistant access to the company straight away, for every user.
- Revoke a user's connection. Contact support to end a particular user's connection.
Users can only reach data their own StrategyX role allows, so existing permissions, departments and visibility rules still apply.
Disconnecting
To disconnect StrategyX, remove or disconnect the StrategyX connector in your AI assistant's settings. In Claude, go to Customize > Connectors and select Remove (or the three dots) next to StrategyX. In ChatGPT, go to Settings > Plugins, select StrategyX and choose Uninstall. In Gemini, select Customize in the sidebar, then select the … menu next to StrategyX and remove it. In Grok, go to grok.com/connectors, select StrategyX and choose Disconnect.
When the connection ends, the assistant loses access to StrategyX. You can also ask [email protected] to revoke a connection for you.
Current limits
- A single answer returns up to 25 items. Ask the assistant for the next page, or narrow your question with filters such as owner, department or due date.
- You can connect up to five companies per connection.
- Not everything you can do in the StrategyX app is available through the connector yet. If the assistant says it can't do something, use the StrategyX app instead.
- Every result includes a link that opens the item in the StrategyX app.
Troubleshooting
My company shows as "Not enabled" at sign-in
AI connectors are switched off for that company. Ask your StrategyX administrator to switch them on (see For administrators).
The assistant says it can't find an item I can see in StrategyX
Check that you selected the right company when you connected, and mention the company name in your question. To add a company, disconnect and connect again.
The connector stopped working
Your connection ends after a password change, a change to two-factor authentication or a long period without use. Disconnect StrategyX in your AI assistant and connect again.
The assistant can read data but won't make changes
Updates may be turned off for your company, the change may not be available through the connector yet, or it may need something the app requires (such as an approval). The assistant will show the reason. Make the change in the StrategyX app or ask your administrator.
The answer looks wrong
AI assistants can misread or leave out information. Use the link in the answer to check the item in StrategyX before relying on it.
Support
For help with the StrategyX MCP server, email [email protected] or start a live chat below. Tell us which AI assistant you use and what you were trying to do.
Our Privacy Policy & Terms of Use